


And so here I am, having a go at Steampunk for the first time, when for everyone else I think it's pretty much yesterday's news... :)
The reason? This month's "Having A Laugh" CJ has the theme of Steampunk/Ladies/Grunge
Now, I was tempted to go with Grunge and do a page on Pearl Jam and another on Nirvana, but I didn't think this was quite what the book's owner had in mind, so I went with Steampunk and Ladies:
 First of all, we were asked to make an ATC as our sign in ..... mine is above. The little propeller spins :) Trouble is I wonder if it still actually looks much like an eye .... I think I preferred it before I added the hardware:
Ah well, never mind.
The reason? This month's "Having A Laugh" CJ has the theme of Steampunk/Ladies/Grunge
Now, I was tempted to go with Grunge and do a page on Pearl Jam and another on Nirvana, but I didn't think this was quite what the book's owner had in mind, so I went with Steampunk and Ladies:

Ah well, never mind.
Next up, we could do either one or two 7"x5" pages for the book, I'm greedy so of course I took two!
First up, my steampunk girlie.
I cheated a little with this one, and used an online doll dress-up programme to design my lady - it's a lot of fun if you want to try it yourself: http://www.dolldivine.com/mega-steampunk-dress-up.php
(NB when you first go in it loads up an advert, you have to click the "play game" button in the bottom right hand corner which activates after the ad has been running for a few seconds)
 <----
<----
This is the "doll" I ended up with
I printed her out and traced her onto some watercolour paper, and then coloured her in with watercolours, in a slightly more subdued palette than the original
 Half coloured in:
First up, my steampunk girlie.
I cheated a little with this one, and used an online doll dress-up programme to design my lady - it's a lot of fun if you want to try it yourself: http://www.dolldivine.com/mega-steampunk-dress-up.php
(NB when you first go in it loads up an advert, you have to click the "play game" button in the bottom right hand corner which activates after the ad has been running for a few seconds)

This is the "doll" I ended up with
I printed her out and traced her onto some watercolour paper, and then coloured her in with watercolours, in a slightly more subdued palette than the original


Fully coloured in and cut out with my trusty X-Acto:
And here is the finished page - I used a gelli print for the background, with stencilled cogs - and typed up the wording on Erika, my beloved 1980s typewriter:


I took some step by step photos as I was painting the face, so I could refer back to them to remember how I had tackled the shading in the underpainting, here they are in case they are of any use to anyone else wanting to try the same technique:
Th-th-th-that's all folks!
Until my next blog post anyway (which really ought to be a Rocking Your World Monthly post as I haven't done one since March!)
And here is the finished page - I used a gelli print for the background, with stencilled cogs - and typed up the wording on Erika, my beloved 1980s typewriter:

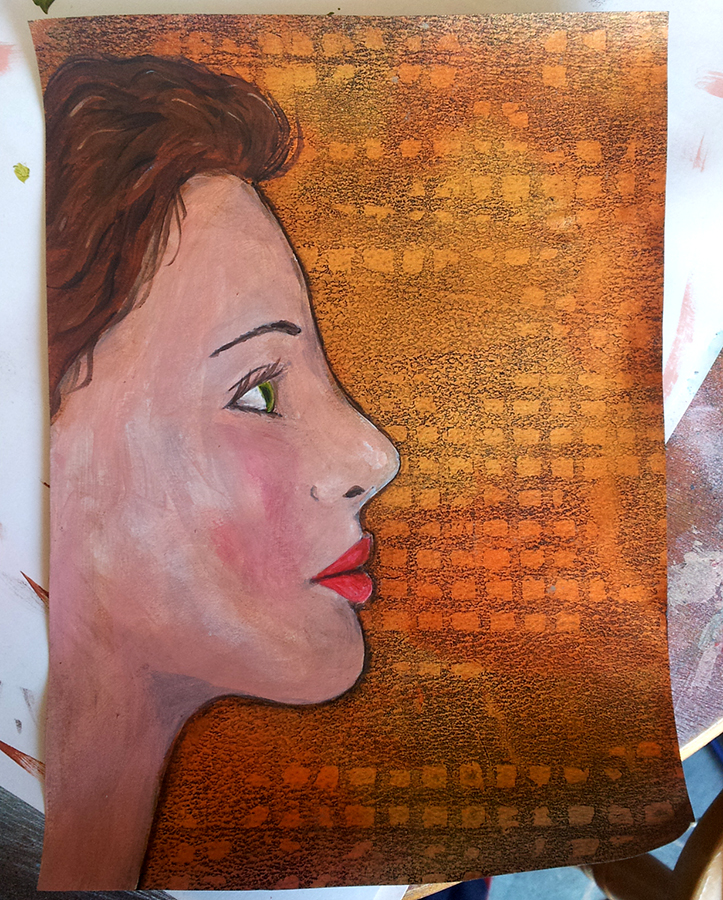
For my second page, I dropped the steampunk angle and just went with "ladies" - well, one lady anyway:

That's another metallic gelli-plate background, with a face painted with acrylics straight onto the page this time rather than cut out and stuck on
 |
| Face sketched straight onto the page, firstly in pencil then with a black POSCA paint pen |
 |
| Colour in the whole face apart from the hair with a very pale skintone colour - then referring to the reference photo, use a white paint pen to shade the areas with the lightest highlights (side and tip of nose, above top lip, whites of eyes....) |
 |
| Block in the hair with a mid-brown paint, and then with the same brown paint mixed 50:50 with glazing medium, shade in the parts of the face that are mid toned in the reference photo |
 |
| With a darker shade of brown, start adding some texture into the hair , and also block in the darkest shadows (top of the nose, under her chin etc) - don't panic that all the shading looks really harsh at the moment |
 |
| Add some pinky red to her cheeks and lips |
 |
| And this is where all that work with the shading starts to pay off - you need to mix up a semi-opaque skin toned glaze (I use a touch of the brown I used for her facial shading, a tiny touch of white, a touch of red and a fair bit of glazing medium - you can see the resulting glaze in the tub at the top of the picture), and paint over everything except the whites of her eyes and her hair - there, that looks better doesn't it :) |
 |
| All that's left to do are the finishing touches - some colour in her eye and on her lips, some wisps of hair around the hairline (and some little highlights in the hair too), add her eyelashes and darken her brows. Plus I added a little more glaze under the chin as I thought the shadow there was still a tad too dark. And I defined her outline with a watersoluble graphite pencil to make her "pop" a tad more against the background |
Until my next blog post anyway (which really ought to be a Rocking Your World Monthly post as I haven't done one since March!)


6 comments:
Thank you for the step-by-step on the underpainting - this technique is so effective at achieving a realistic skin tone.
Lovin' all the Steampunk stuff - that ATC does still look like an eye btw.
xx
Oh Sarah thank you for providing the step by step, the face looks awesome and I love all the shading methods! The eye ATC is great too I like the spinning propeller and love the steampunk doll and the website!
What wonderful pages you have created I like the step-by-step picks as well. So much to absorb on this post thank you Dxx
So much gorgeousness in one post. I love both versions of he ATC, I think the propeller is just so clever (and slightly creepy) and fab!
Thanks for the step by step - it really is really effective!
Hi Sarah, just catching up on all yourblog posts I have missed! Loving the steam punk atc and AJ pages and the step by step tutorial is fantastic , I will be giving that a go! Good to see all your fab art x
Sarah these are quite stunning! Love the metallic gelli backgrounds!
Post a Comment